DoDeDoDo – A Location Based Enquiry Tracking System
The Problem
For years WA libraries have been tracking information requests/enquiries that staff (mostly front-of-house) handle in their day-to-day work. From this financial year onwards we are now required to break down these enquiries into five categories:
- Reference transactions and information requests
- eResource enquiries
- Technical enquiries (including public PC and photocopier/printing help)
- Community information and Government services enquiries
- Any other enquiries (Including directional)
Currently we use a mixture of paper based recording and hand held people counters to record all interactions. Accuracy of this recording is dubious at best as staff often forget to mark down interactions as they happen and either don’t record them or bulk add at the end of their shifts. Adding five new categories, while not difficult, could create more potential for busy staff to forget or record these stats incorrectly.
Solutions
Paper (simple)
Of course the easiest solution would be to create a sheet of paper where staff can just mark next to each interaction. Staff are already doing this however as stated before there are inconsistencies and errors (mostly under reporting) inherent in this setup. Observation (and firsthand experience) shows that staff frequently move away from the main circulation area to answer enquiries about public PCs, photocopiers, and printers. Often staff are pulled to another location or have to answer several other queries at the same location. Getting back to the sheet to record a single enquiry statistic can take several minutes and enquiries later.
Spreadsheet (simple)
Having multiple sites of contact could prove to be the solution to the problem. With various staff terminals around you could set up a simple spreadsheet on a shared drive and staff manually record the date, time, and interaction type. This requires significantly more time to complete than simply marking a line in a column, however you will end up with more useful data (time) which you can then use to plot busy times and inform staffing rosters.
Web page (moderate)
You could remove the time consuming part of the spreadsheet by replacing the interface with a simple web frontend. A locally hosted page could invite staff to click on a button to record a type of statistic and automatically record the date and time. The advantage of this is the page could be run on any staff networked PC and run side-by-side to existing staff web pages (especially if you are using a web based LMS). The only down side I can see is that staff need to switch tabs to access the sheet which when busy could be forgotten, meaning staff will then ‘bulk report’ when it becomes quiet.
Tabulatron (moderate-difficult)
Of the three solutions so far this was the one I was going to implement, however I remembered reading a paper on Code4Lib by Tim Ribaric and Jonathan Younker called Arduino-enabled Patron Interaction Counting. Tim and Jonathan created a push button device that staff could simple press to record a specific type of enquiry at the point of enquiry. Tim has since made an updated version of this using a Raspberry Pi – Redux: Tabulating Transactions with Raspberry Pi and Visualizing Results which looks like a good evolution of his creation. Both versions of the Tabulatron use a Google Sheet to record the interactions which means multiple devices could be in use at one time and retrieving the data is relatively straight forward.
I was all set to start ordering parts when I realised that the same problem with the paper existed for the Tabulatron – it required staff to go to a central point to record the stat. What I really wanted was a solution that I could place at the point of interaction, reducing the time between client enquiry and staff recording. That’s when the idea for the DoDeDoDo came to me.
If you’re going to name something why not name it after Black Books?
DoDeDoDo (moderate-difficult)
Hardware
DoDeDoDo is a nodeMCUESP8266 microcontroller with wifi connected to an RC522 NFC RFID reader/writer. That’s it. I wanted to keep it as simple as I could to enable others to replicate it quickly and easily, additionally keeping the physical size and costs down meant I could implement multiple nodes across all our branches. A nodeMCU will set you back around $9.95 and the RC522 about $9.90, add in some wires, a bit of time soldering and you can have a node up and running in about 20 minutes.
Hardware wise, once you put it in a case (3D printed of course) it takes up about as much room as a regular security door RFID reader. They can also run on a couple of AA batteries (3.3V) as well, which means you could literally put them anywhere. My RC522 card came with two RFID fobs and a RFID card, my original intention was to have the RC522 read existing staff RFID cards however the reader didn’t pick these up, extra fobs and cards are very cheap though.
Software
I liked the simplicity of Tim’s Tabulatrons sending the time stamped data to a Google sheet. While I would prefer to have it sent to a locally hosted document I again wanted to go for simple and accessible for other libraries to replicate. To get the RFID reader connected and running I used this guide by TheCircuit on Instructables. I did have some problems with the wiring diagram and settings as it all got a little confusing (something tech documents tend to do, in my experience, is assume a large amount of prior knowledge and you can spend four hours and sixty tabs open trying to understand the one missing step in a guide!), as such I’ll post below a very simple, step-by-step guide to all the hardware and software below for those interested in replicating the project.
In my effort to keep this setup as simple as possible I decided to use un-encoded or blank RFID cards rather than encode each one to a staff member. The main reason for this was how to update all the nodes, once in place over several branches, with new RFID information when new staff start or cards are lost/replaced. Someone better at this than me might have created a central log with active cards and had the nodeMCU check in before reading the card but this would delay the transaction and was beyond my simple coding skills. Instead the RC522 just looks for new RFID tags and then tells the nodeMCU to use a GET call to send pre-set information to the Google sheet, ie. each node is coded for a specific type of enquiry. I did toy with the idea of having a generic node which used different coded RFID tags (red for technical, blue for general, etc.) but in talking to staff this was not a preferred method, but it could be an option that others might use.
While I would have liked the nodes to talk directly to the Google sheet it proved too hard as the nodes only process HTTP GET calls and Google requires HTTPS. A solution came in the form of a (free) service called PushingBox which I found from this excellent guide from teachmemicro.com, which sits between the node and the Google sheet and processes API calls. The only downside is PushingBox is limited to 1000 calls per day. Paid services exist for higher volumes and work very similarly, so if you find this works you can pay for a more robust service. That said, I’d be looking at making a separate account for each of my library branches and have each group of nodes use their own account. If you do use PushingBox don’t forget to donate and help keep it running.
How does it work though?
Let’s walk through the code step by step and you can see how each node works. Most of this is a slightly modified version of teachmemicro.com’s guide with a little bit more clarity.
NB: These instructions will show you how to setup for one branch only, if you will be processing over 1000 enquiries per day you may need to setup additional Google accounts for each branch to use with PushingBox, or use a paid provider or if you have the skills implement something like HTTPSRedirect on your nodeMCU.
Setup
Step 1: Create a Spreadsheet
Firstly you need to setup a Google Form and Sheet. Log into your Google Drive account and create a spreadsheet and name it something relevant ‘DoDeDoDo – Library Branch’.
Step 2: Create a Form
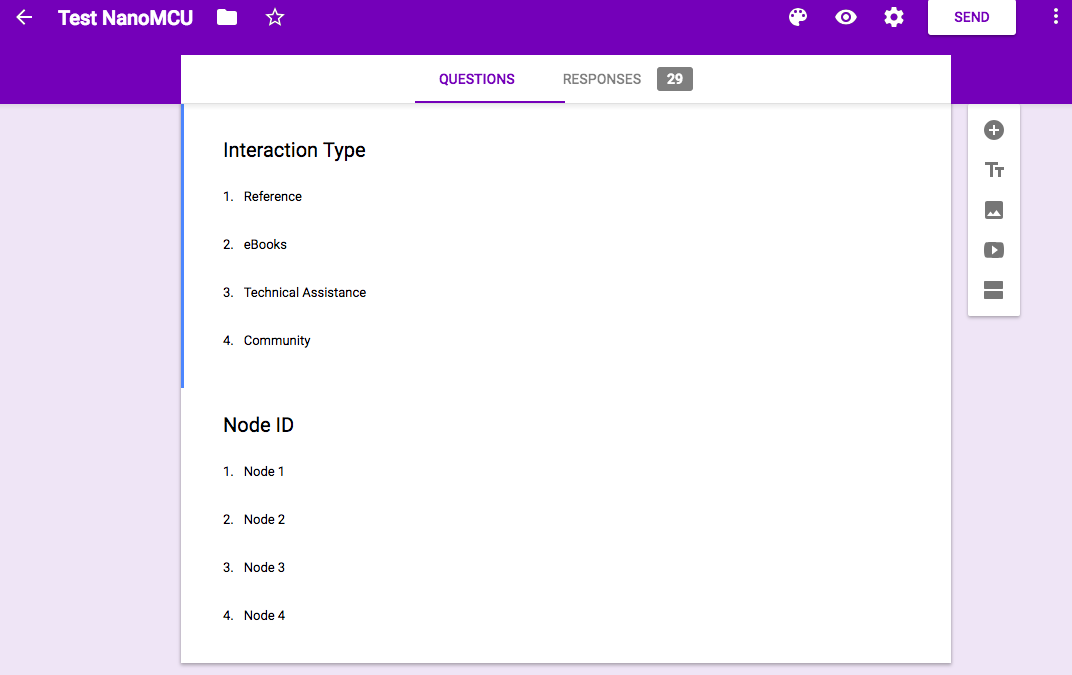
Create a new Form and name it after the sheet. Create a ‘dropdown’ question box and enter in your interaction type data. For Western Australian public libraries this is where we would enter in our five types of enquiry.
Create a second ‘dropdown’ question box and call this ‘Node ID’ and enter in the names of each node. This could be ‘Node 1’, ‘Node 2’, ‘Node 3’, etc. or something location based like ‘Public PCs’, ‘Photocopier’, or ‘Adult Non-Fiction’. Alternatively, you could label each node something unique like ‘SurfKing’.
Step 3: Get the entry fields
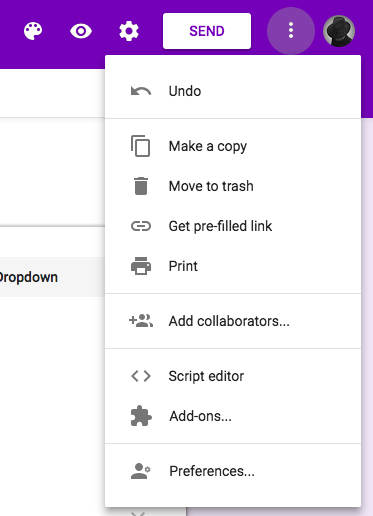
Once you’re happy with your form, click the three dots menu on the top right and select ‘get pre-filled link’. This will take you to an entry view for your form, here you can set pre-filled responses (which you could easily turn into a one-click link for a web only version of this project for back-of-house staff).
Fill in the form with any response ie. ‘Reference’ and ‘Node 1’ and click the ‘GET LINK’ button. Paste the now copied link into a note pad as we are going to pull out two pieces of information from it.
It should look something like this:
https://docs.google.com/forms/d/e/1FAIpQLScKRqbOYnAACG9vyyWqPQiwuviTqiUrmvI5BfNZcwGq2A2OSA/viewform?usp=pp_url&entry.1927206069=Reference&entry.1745966778=Node+1
We are interested in the parts after ‘viewform?’
viewform?usp=pp_url&entry.1927206069=Reference&entry.1745966778=Node+1
Our first input field is called ‘entry.1927206069=’ and the second ‘entry.1745966778=’. This is what our nodes will be sending data to. Keep these two fields aside, and the original URL, as we will be using them later.
NB: you could easily have more than two fields, they will just append to that url. This means you could add a branch field or have a node name field with a location field meaning you can move nodes around without having to rename them.
Step 4: Pushingbox
Go to pushingbox.com and login with the same Google account you used to setup the Sheet and Form.
Once logged in go to ‘My Services’ and ‘Add a service’, and select ‘CustomURL’. This is setting up the base URL of the GET request.
Name the service something like ‘DoDeDoDo’ and for the Root URL field copy in your pre-filled form URL up to the ‘viewform?’. You then need to replace ‘viewform?’ with ‘formResponse’.
Eg.
https://docs.google.com/forms/d/e/1FAIpQLScKRqbOYnAACG9vyyWqPQiwuviTqiUrmvI5BfNZcwGq2A2OSA/formResponse
Leave the method field as GET.
Save and go to ‘My Scenarios’. This will now setup the data variables.
Enter a name for the scenario, I used ‘DoDeDoDo’ to keep everything consistent, and then click ‘Add’.
Click ‘Add an Action’ and select ‘Add and action with this service’ on the service you just setup (in my case it was ‘DoDeDoDo’).
In the Data field you need to add in those field names we saved earlier. It should look something like this:
?entry.1927206069=$query$&entry.1745966778=$node$
If you have other fields append this with $entry.###########=$<field name>$ .
You’ll notice that we’ve changed our responses from ‘Reference’ and ‘Node+1’ to ‘$query$’ and ‘$node$’. These are now two variables that we will set in the nodeMCU code. This will allow us to set up multipule nodes sending different responses via the same API call. You’ll see this in the code below.
Once you’ve setup the Scenario you’ll be presented with a deviceID which appears next to the Scenario name. Save this for later.
That’s it for the hard stuff, now onto programming our nodeMCU.
Step 5: Programming the nodeMCU
What ended up being a rather simple code (see below) actually took me a while to get to because of all the ‘assumed prior knowledge’ that comes with coding. I’ll try my best to walk you through my mistakes and help make this easy for anyone who hasn’t coded using a microcontroller before. All you advanced coders can just skip most of this and implement the code below. It’s scrappy and probably not the best but it works!
Follow my wiring diagram and make sure you have your RC522 and nodeMCU connected before uploading the code. If you change the SDA (SS) and RST pin locations make sure to update the definitions in the code.
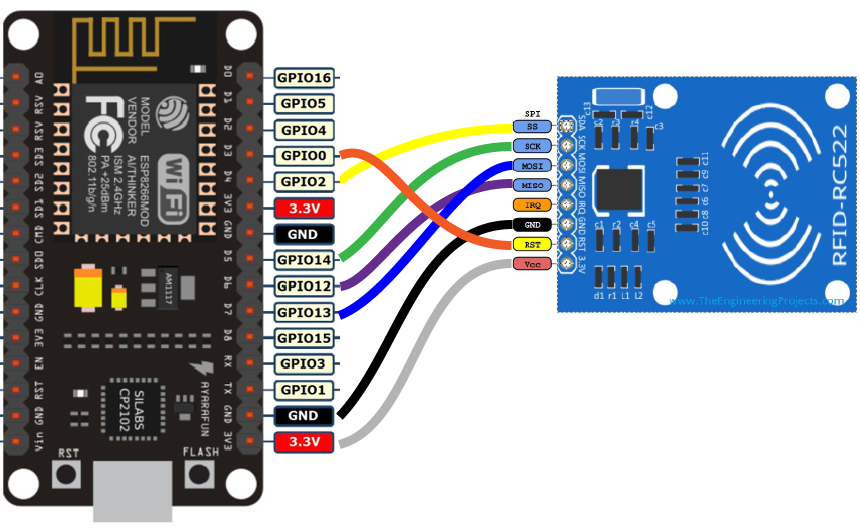
| nodeMCU Pin | to | RC255 Pin |
|---|---|---|
| D3 | RST | |
| D4 | SDA | |
| D5 | SCK | |
| D6 | MISO | |
| D7 | MOSI | |
| GND | GND | |
| 3.3V | 3.3V |

I have the pin configuration wrong in this image - whoops!
Software
Once you have your hardware sorted you will need to download the Arduino IDE.
After installing you will need to setup for the nodeMCU board. Open the IDE and:
- Select File and then click on Preferences.
- In the additional Boards Manager URLs add the following link http://arduino.esp8266.com/stable/package_esp8266com_index.json
- Click OK and then navigate to Tools - Boards - Boards Manager
- In the search field type esp8266 > click the esp8266 by ESP8266 Community - Click Install
- The ESP8226 library has been added.
Note: I was using a Mac and had to install a driver to get my board to show up. Check the chip (tiny black square near the USB port) on your nodeMCU and if, like mine, it says CP210x you need to download and install this driver, otherwise there is a signed Mac OS CH340 Winchiphead driver out there.
Now you need to install the RFID library for MFCR522 created by Miguel Balboa. Download the library as a .zip file and import it into Arduino IDE.
With all those dependencies installed you can now open a new Sketch in Arduino and copy the following code.
DoDeDoDo Code
/*
 * RFID reader that pushes out an API call to Pushingbox service to record statistical data in a Google Sheets document.
 *
 */

#include <ESP8266WiFi.h>
#include <ESP8266WiFiMulti.h>
#include <ESP8266HTTPClient.h>

#include <SPI.h>
#include <MFRC522.h>

#define RST_PIN 0 //D3 on the nodeMCU
#define SS_PIN 2 //D4 on the nodeMCU

const char* host = "api.pushingbox.com";  // Pushingbox API URL

MFRC522 mfrc522(SS_PIN, RST_PIN);  // Create MFRC522 instance
ESP8266WiFiMulti WiFiMulti;
void setup() {
    Serial.begin(115200);
    SPI.begin();      // Init SPI bus
    mfrc522.PCD_Init();   // Init MFRC522
    delay(10);

    // We start by connecting to a WiFi network
    WiFi.mode(WIFI_STA);
    WiFiMulti.addAP("<your SSID>","<your Password>");

    Serial.println();
    Serial.println();
    Serial.print("Wait for WiFi... ");

    while(WiFiMulti.run() != WL_CONNECTED) {
        Serial.print(".");
        delay(500);
    }
    Serial.println("");
    Serial.println("WiFi connected");
    Serial.println("IP address: ");
    Serial.println(WiFi.localIP());
    delay(500);
   }
   //This loop checks for new cards and then sends a GET request
void loop() {
    // Look for new RFID cards
  if ( ! mfrc522.PICC_IsNewCardPresent()) {
    return;
  }
    // Select one of the RFID cards
  if ( ! mfrc522.PICC_ReadCardSerial()) {
    return;
  }

    // If RFID card is detected use WiFiClient class to create TCP connections
    WiFiClient client;
    const int httpPort = 80;
    if (!client.connect(host, httpPort)) {
      Serial.println("connection failed");
      return;
    }

    // We now create a URI for the request
    String url = "/pushingbox?";
    url += "devid=";
    url += "<your pushingbox device ID>";
    url += "&query=Reference";
    url += "&node=Node+1";

    Serial.print("Requesting URL: ");
    Serial.println(url);

    // This will send the request to the server
    client.print(String("GET ") + url + " HTTP/1.1\r\n" +
               "Host: " + host + "\r\n" +
               "Connection: close\r\n\r\n");
    unsigned long timeout = millis();
    while (client.available() == 0) {
      if (millis() - timeout > 5000) {
      Serial.println(">>> Client Timeout !");
      client.stop();
      return;
   }
  }
}
Step 6: Variables
In the above code there are several variables you need to change.
Wifi Settings
WiFiMulti.addAP("<your SSID>","<your Password>");
Replace
Note: the nodeMCU is limited to 2.4Ghz. I had to have this enabled on our router as we only had 5Ghz channels.
Pushingbox and data variables
This block creates the GET URL to send to Pushingbox which then enters the data into the Google sheet.
    url += "devid=";
    url += "<your pushingbox device ID>";
    url += "&query=Reference";
    url += "&node=Node+1";
Enter your DeviceID from pushingbox and then use the ‘&query=’ for your query type and ‘&node=’. Here I’ve got it set up to send the response ‘Reference and Node 1’ to the sheet.
I will have a different node for each enquiry so for our eResource enquiries node I would set it up as:
    url += "devid=";
    url += "<your pushingbox device ID>";
    url += "&query=eResources";
    url += "&node=Node+2";
As we used a dropdown menu on our Google Form make sure you use the exact wording on the form. Alternatively you could have used a free text field but I like a controlled vocabulary.
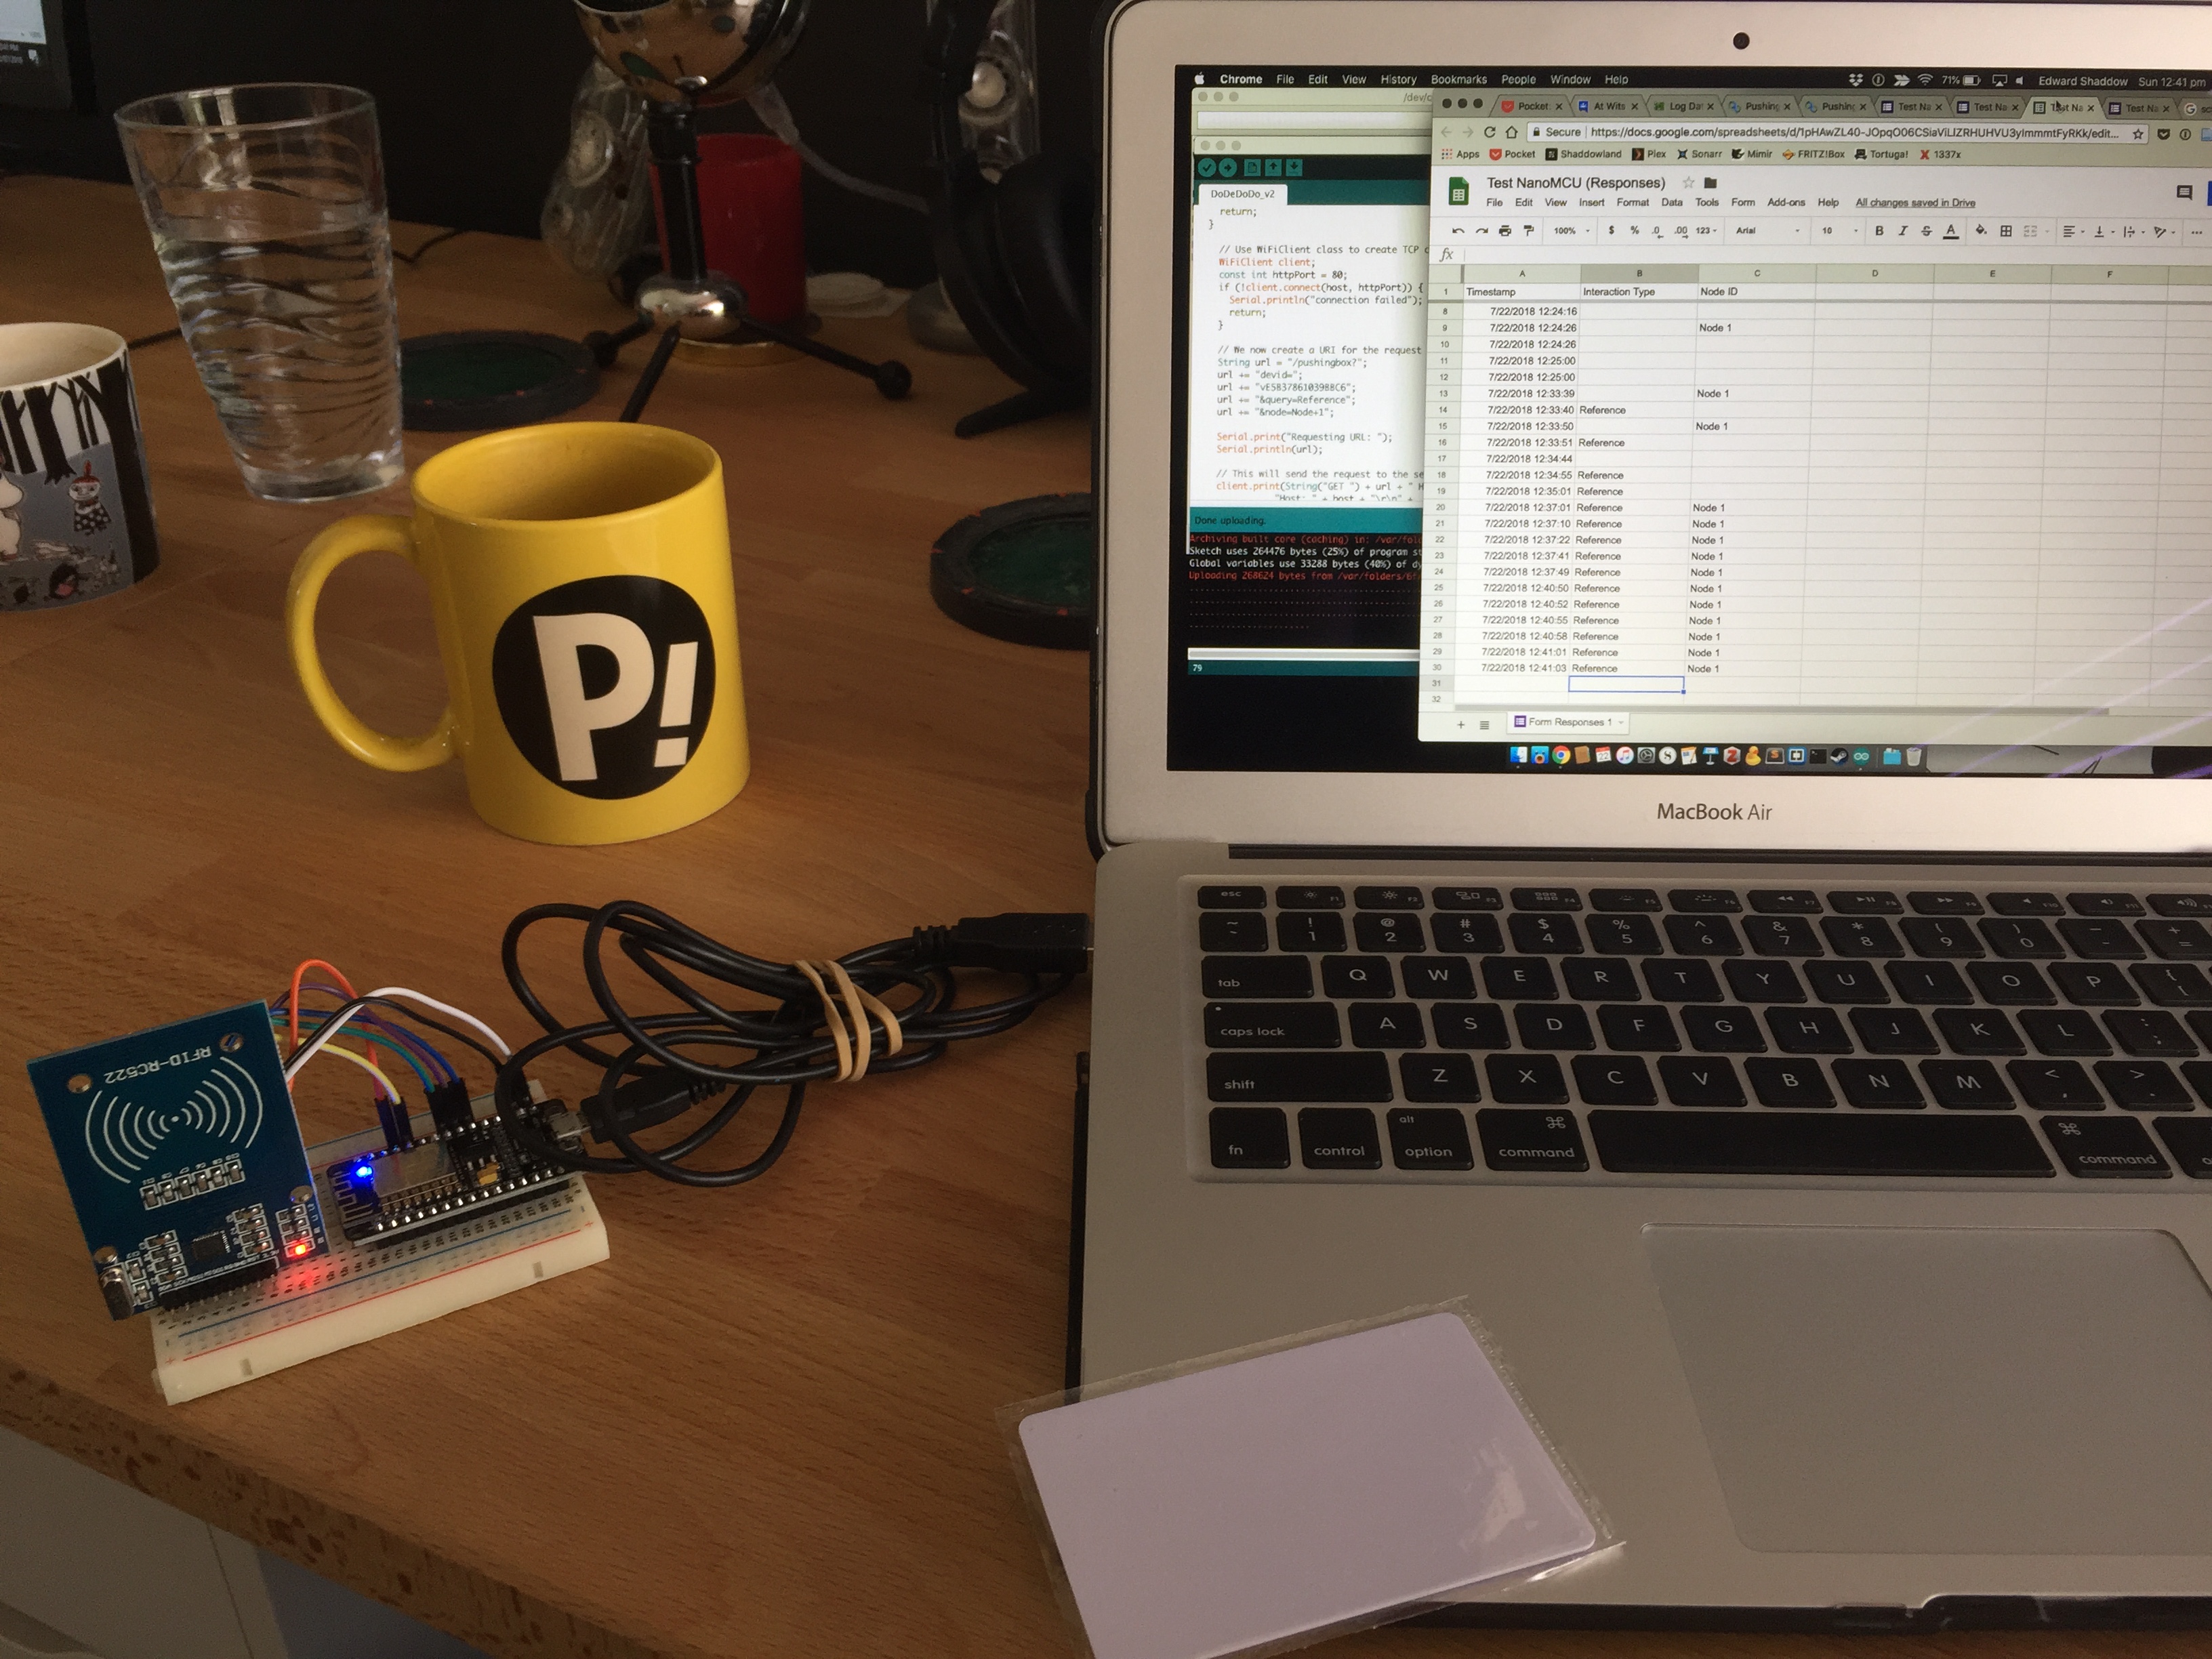
That’s it. Compile and upload your code to the nodeMCU and the blue light on it board should light up once connected to the wifi. It will go out briefly when you pass an RFID tag in front of the reader, this is it sending the data to the spreadsheet. Check the serial monitor on the Arduino IDE (with the board connected) and it should output the pushingbox URLs on each successful tag. You can then see the result in your Google sheet logging date, time, query type, and node name.
The Future
I currently have my prototype board in place at my library and have staff tagging for all queries on the one node. Once staff have tested it and are comfortable with it I’ll look to purchasing several more and setting them up, one each for the five query types with additional ones for technical queries that I will locate near our printers and public PCs. I’ll be looking to see if enquiry recording will be significantly improved by locating nodes near where these enquiries occur, cutting down time between query and recording. This could also help with staff planning as you can easily map the time data and find out the busiest times and add more staff onto the front-of-house roster.
I’d love to hear if anyone else sets up a DoDeDoDo node and has improvements (I’m already thinking an LED might be needed but that adds cost and time to each setup). I’m interested to see which nodes get used more and if additional nodes are needed, or need to be moved.
Build, enjoy, and remember “muffins are for customers”.
Written by
What's Next?

Looking For Group
I was reading this article about how to get through your RPG (role playing game) backlog and decided to combine it with this month’s GLAM Blog Club theme of collect. You see, among the main librarian-esque collecting I do of books, comics, and movies, I collect games. My board game collection is quite extensive as is my RPG collection. So in an effort to find people who would want to help me get through this backlog, and also inspire others to find new games to play, I’ve decided to list all the

Looking Back, Looking Forward
I've often started the conversation of what I've been up to this year with 'it's been a bit of a meh year', but that's not right. It can be hard to see the big picture when you're in the middle of it I guess. In February I started a new job and technically a new career (more on that later), and while COVID put the breaks on my dancing life, I used that time to refocus on myself. This post is about taking time out to breathe and reflect on how far I (we) have come this year, and look up and look
A File Format By Any Other PRONOM Signature
November third is World Digital Preservation Day and what better excuse to blog about my journey into digital preservation so far? This time last year I was being interviewed for what would become my new role as Digital Preservation Officer at an Australian State Library. I remember reading the entirety of the DPC (Digital Preservation Coalition) Handbook trying to bring myself up to speed on all the acronyms, lingo, and underpinning values of digital preservation. This was a specialised world t
It Was the Best of Times...
For me, 2021 has been a mixed bag of good and bad. Charles said it best: “It was the best of times, it was the worst of times, it was the age of wisdom, it was the age of foolishness, it was the epoch of belief, it was the epoch of incredulity, it was the season of light, it was the season of darkness, it was the spring of hope, it was the winter of despair.” ― Charles Dickens, A Tale of Two Cities 2021 didn't start out the best for me. I had put off a lot of things for far too long and t
Growth and Ethics
I recently undertook a personal development practice and found out that two of my highest personal values is growth and ethics. It explains why I find people who refuse to learn, or grow extremely infuriating, and reinforced my stance on personal and professional ethics. So when a professional library group in my state decided to invite a speaker that (for me) violates both of those values I was deeply disappointed. More so, the response I got from my objection was met with: "Our belief is that
The Year That Was
I wasn't going to do a review piece this year because... *gestures around*. However upon reviewing my year I realised there were some really good things that happened and I wanted to focus on them. A little bit of good amongst the bad. I've mentioned before how bad coffee is actually better than good coffee, so I see 2020 as the bad cup of coffee that makes us appreciate all the good ones we've had before. Professional The year started off with a practicum placement at ARDC/Curtin University,

A Year In Read-View 2025
When I write up these reading reflections I always check what I wrote the year before (mostly so I can remember the formatting of these blog posts!). Weirdly, the intro I had been writing in my head for this was almost exactly the same as last year's. I read XX number of comics/books, which was up/down from last year; my novel/non-fiction reading was XX books, up/down from the year before, mostly because my morning reading time on the train has been replaced with writing on the train (mostly); a

A Year In Read-View 2024
I managed to read very nice number of books over 2024, 69 in total. While this is up from the 50 I got through last year, it was interesting to see that the majority of my reading came from graphic novels. This is mostly due to some great titles being available via Hoopla - with the demise of Comixology (and my refusal to help the Amazon juggernaut) I had read fewer and fewer comics over the years, but borrowing them from Hoopla has clearly had an impact. In terms of novels and general non-fict